

The download link at the bottom contains 2 files that will allow almost full control of a Smartfade 12/48 console wirelessly as well as some pictures guiding you through setup. Unfortunately, a piece of software called Osculator is required which, at the moment is Mac only. If there is enough interest in this, I may investigate PC options in the future. Because of the increased control, the template is only for tablets, although with some tweaking it could be made to work on a smartphone. I do not own an Android tablet and I'm not sure if the iPad layout from Touch OSC can be used with the Android version without modifications. Because of the limitations on screen size, this template is made for the Smartfade 12/48.
Hardware Requirements:
- Smartfade 12/48 or 24/96 (Full Control Mode)
- Mac running OS X 10.5.8 Leopard to 10.10 Yosemite (Intel Only)
- USB to MIDI cable
- iPad or Andoid Tablet
- Wireless Router*
* You will need a very strong wireless signal for this. If you are working in a big hall you may need multiple routers bridged together to get good enough coverage. Poor connections could result in the computer not receiving a button press from Touch OSC.
Software Requirements:
- Touch OSC (Available for Android on Google play and Amazon and iPad/iPhone in the App Store for $4.99)
- Touch OSC Editor (Free)
- Osculator 2 (Free to use but you can't save, otherwise about $25 for a license)
http://hexler.net/software/touchosc
http://www.osculator.net/download/
Additional Controls
There are certain commands written in the manual for control via MIDI Note, MIDI CC and MIDI Program Change, but there are some that are not.
Here are the additional controls I've found:
Next
Rate
Preview
1-24
25-48
Clear
<
Menu
IND 1
Power Button
Undo
Copy
Record Sequence
Magic
Record Memory
Edit Memory
Snapshot
<<
Ind 2
Encoder +
Encoder -
Missing Functions:
Inability to control channels from normal fader pages 1-24/25-48
Workaround: Map those faders to one or two of the memory pages. Yes you will lose two memory pages doing this but it's unavoidable. I have still put in the ability to switch to pages 1-24 and 25-48 as it might be useful for resetting menus if you get lost.
Feedback from the LCD
No workaround at the moment: Unfortunately there is nothing practical I can do about this. It may be possible to have a page that would show you the Menu lists with the current position indicated via LED feedback, but I can't really see a practical use for this.
Feedback from the Smartfade
No workaround at the moment: Currently, all feedback is generated from Osculator. I am having trouble getting feedback from the Smartfade on buttons not listed in the Manual. It seems like the Smartfade is simply not sending any MIDI out after pressing these buttons so there may be nothing I can do about this.
As stated earlier, a strong wireless signal is important. Because of the feedback not coming from the Smartfade for certain functions, your computer might not register a button press. If things seem to be off you can hit the clear button multiple times or the << button to reset to a state you can work from.
Stack Feedback and Jumping Steps
Will add in future version: As written in the manual, with MIDI PC you can jump to steps 1-99. I am trying to figure out a way to do this with a keypad instead of having a page cluttered with buttons. Feedback for what step you are on is possible but would take quite a bit of additional programing.
Layout
There are two pages in this template. The Home page (page 1) and the Memory Playback page (page 2). I will refer to them as such for clarity's sake since different memory banks on the Smartfade are also called pages.
Home Page:
Set up to mimc the layout of the control section of the Smartfade with some additions. To the left of the normal controls are indicators for which memory page you are currently on. The indicators will match those on the Memory Playback page. On the far left are bump buttons 1-24 with 21-24 in yellow to indicate Sequences. You cannot change memory pages from the Home page but this is where you will record new memories.
The indicators for the current memory page will start working after selecting a memory page from Touch OSC.
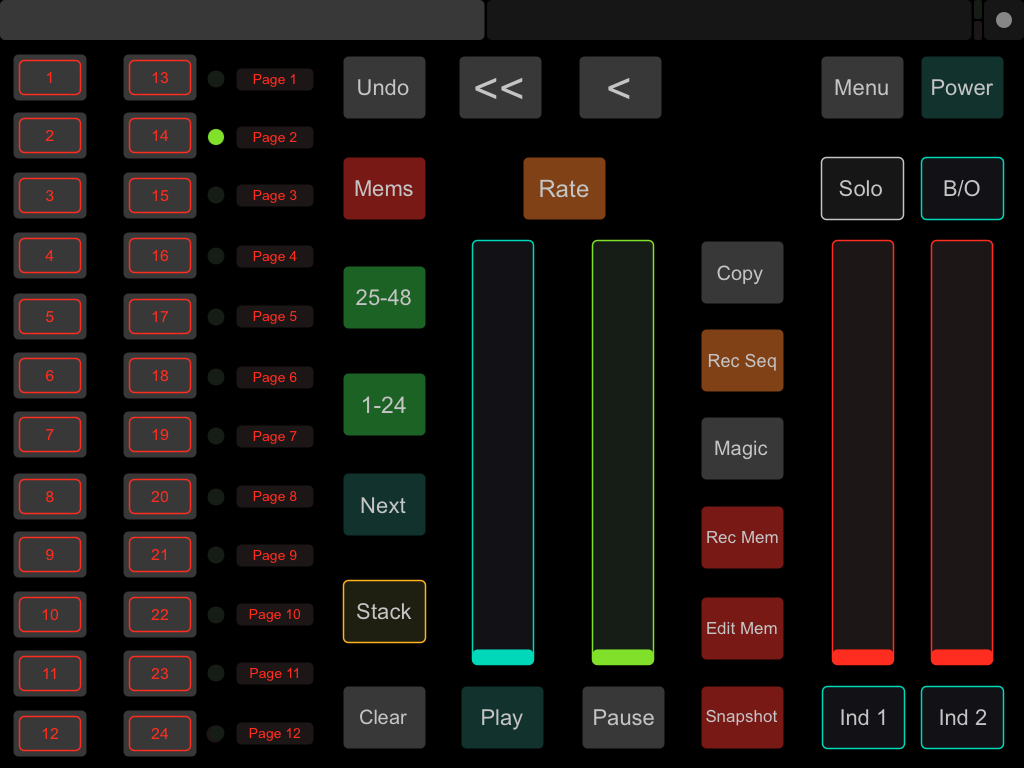
Memory Playback:
Dedicated to memory playback via bump buttons and faders. On the right side you can change memory pages by clinking buttons Page 1 through Page 12. The indicators will light up on both the Home page and the Memory Playback page accordingly.
The indicators for the current memory page will start working after selecting a memory page from Touch OSC.
Special thanks to Richard Howey for creating the original template and giving me the idea to create something like this. I more or less too a loot from his memory fader page layout and tweaked it a bit. Here is a link to the original layout with instructions on how to set things up in a different way with Touch OSC.
https://www.etcconnect.com/Support/Articles/SmartFade-TouchOSC-Layouts.aspx

Setup
You will need your tablet and computer be on the same wireless network for this to work. Closed networks are always preferred.
Setting up Osculator:
After downloading Osculator and open the .osc file, look in the top left corner of the window to confirm that Osculator is running (if it is you should see a green pause button, when paused you should see a green start button). Next confirm the OSC Input Port in the box to the right. The default should be set to 8000 so unless you are running multiple instances, leave it at that.
Next click on the Parameters icon on the far right. Another screen should drop down with four main buttons at the top. Click on I/O and then click on Select active MIDI Outputs. From the drop down menu select your USB to MIDI device. If it doesn't appear there, check Audio/MIDI setup and make sure the computer sees the device. If not, you might need to download drivers.
Setting up Touch OSC:
After downloading Touch OSC Editor open the .touchosc file on your computer and click the Sync button.
Now go to your tablet, open up Touch OSC and navigate to the menus page. Under Connections at the top select the first row OSC. If Osculator is running, your computer name should show up at the bottom under Found Hosts. Click on that and the Host IP should be entered automatically. Confirm that your outgoing port is set at 8000 and the incoming port at 8001.
Next click on the Layout section. Then click on Add at the top. If Touch OSC Editor is in Sync mode, your computer name should show up again under Found Hosts. Click on the name of your computer to automatically download the template to your tablet. If you are having time out errors when trying to download via sync, try manually putting in the computers IP address by clicking Edit on the far right of the screen and then the + on the far left and see if that fixes it.
Navigate back to the main menu page and click done. You should be set up and ready to go. If you are not able to control the Smartfade, look at the Osculator window to see if the indicator squares to the left of the message names are lighting up. When Osculator is receiving messages properly these will light up green. The memory page indicator messages will light up yellow.
Notes:
Please assume that any of the additional features I've found that are not listed in the manual will not be supported by ETC. Please do not contact them for support relating to those functions.
If you end up using this and find any bugs, post here and I'll try and fix them when I have time.
Download Link: https://www.dropbox.com/s/qm65poepa87cgdh/SF%20Touch%20OSC%26Osculator.zip?dl=0


