Road HOG4 (v.3.19.0) vs Rosendahl MIF4 MIDI timecode interface

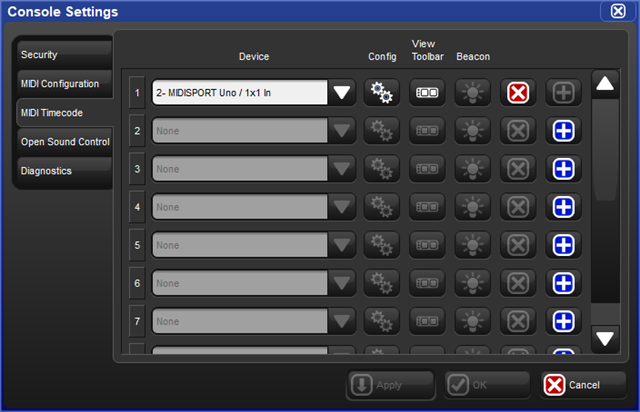
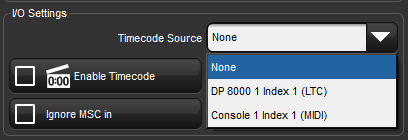
I have a problem. My Road HOG4 (v.3.19.0) does not see the Rosendahl MIF4 MIDI timecode interface. I want to do a Timecode controlled show. What to do step by step? Audio software: Steinberg WaveLab, audio interface: MOTU 828MKII.

Parents
  • Hello,

    I do not know if your device requires a driver but if it does it will not work on your Road Hog 4

    Only generic "USB MIDI Class" devices are supported. Any USB MIDI devices that require proprietary drivers may work with Hog 4 PC as long as the specific driver is installed on the Windows machine but these types of USB devices that require specific drivers will not work with Hog 4 OS consoles.

    Setting up MIDI step by step can be found in Section 21.4.1 of the Hog 4 help manual

Reply
  • Hello,

    I do not know if your device requires a driver but if it does it will not work on your Road Hog 4

    Only generic "USB MIDI Class" devices are supported. Any USB MIDI devices that require proprietary drivers may work with Hog 4 PC as long as the specific driver is installed on the Windows machine but these types of USB devices that require specific drivers will not work with Hog 4 OS consoles.

    Setting up MIDI step by step can be found in Section 21.4.1 of the Hog 4 help manual

Children
  • My device does not need a driver. Road HOG 4 "sees" them as MIDI Configuration/Timecode. What should I do next?

  • 21.4.1 Configuring MIDI Timecode Input Devices

    Follow these steps to connect and configure a MIDI timecode device on a console:

    1. Connect the output end of a third party MIDI Timecode device to the "MIDI In" port on the back of the console. If you are using an external USB MIDI device to receive MIDI Timecode then connect the external USB MIDI device to one of the USB ports on the console. Please note that only generic "USB MIDI Class" devices are supported. Any USB MIDI devices that require proprietary drivers may work with Hog 4 PC as long as the specific driver is installed on the Windows machine but these types of USB devices that require specific drivers will not work with Hog 4 OS consoles.
    2. Open the Network window. [Setup  Network]
    3. Select a console from the list of devices in the network window and then press the Settings button.
    4. Select the MIDI Timecode tab of the Console Settings Window.
    5. Map a MIDI device to one of the eight indexes by pressing the blue plus button located to the far right of the index, then select a MIDI device from the device drop down menu and press Apply. (On Hog 4, Hog 4-18, and Full Boar 4 consoles the built-in MIDI device will be listed as "LTCMIDI".)

    21.4.2 View Incoming MIDI Timecode

    To view incoming timecode for a specific MIDI device navigate to the MIDI Timecode tab of the Console Settings window and enable the "View Timecode Toolbar" button on the appropriate device mapping.

    The timecode toolbar can also be displayed for a MTC device by pressing the View Timecode button at the top of the master window for any cuelist that is assigned to receive timecode from that device.

    The Timecode Toolbar displays the incoming timecode type, format, value, and frame regeneration. Frame Regeneration occurs when the console does not receive a clean timecode signal and must make up for the missing frames in order to prevent missed cues. You can set how many frames of timecode are generated by the console before timecode is lost in the timecode settings window by clicking on the word movie slate icon in the timecode toolbar.


    21.4.3 Triggering Cues from MIDI Timecode

    Each cuelist can be assigned to listen to different timecode sources from different consoles. To select MIDI timecode as the source:

    1. Open  Choose : open the Cuelist window.
    2. Options  Cuelist : go to the Cuelist pane of the Playback Options window.
    3. Select a MIDI timecode source from the drop down list:

    1. Ensure that the Enable Timecode button is selected.


    Tip: The Enable Timecode button at the top of a cuelist's master window allows for quick enabling and disabling of timecode input for that specific cuelist.


    To trigger a cue from timecode:

    1. Open  Choose : open the Cuelist window.
    2. Select the Wait cell for the cue, and press Set.
    3. From the toolbar, select Timecode.
    4. Enter a timecode value in hours, minutes, seconds and frames, in the form hh/mm/ss.ff, then press Enter.

    As well as entering timecode values manually, you can use Hog 4 OS's learn timing function to quickly associate timecode values with cues; see Learn Timing.

    By default, cuelists will follow the incoming timecode, even if the timecode skips forwards or backwards; generally, this is a useful behaviour as, for example, you might ‘rewind’ the timecode during rehearsals to repeat a part of the show, and the cuelist will automatically go to the correct cue. Sometimes you may want to prevent a cuelist going backwards if the timecode goes backwards. You can do this using Trigger Forwards Only:

    1. Open + Choose  Options  Cuelist
    2. Select Trigger Forwards Only.

    21.4.4 Editing Timecode Values

    To change the timecode value used to trigger a cue:

    1. Open  Choose : open the Cuelist window.
    2. Select the Wait cell for the cue, and press Set.
    3. From the toolbar, select Timecode.
    4. Enter a timecode value in hours, minutes, seconds and frames, in the form hh/mm/ss.ff, then press Enter.


    You may need to change the timecode value for one cue, and then change the timecode values for subsequent cues by the same amount, to keep the same relative timings. For example, you might have a series of cues where each one is triggered by timecode one second after the previous one. If the timecode value triggering the first cue needs to be increased by 12 frames, you may want the values for all the subsequent cues to also be increased by 12 frames to maintain the 1 second separation. Hog 4 OS allows you to do this easily:


    1. Open  Choose : open the Cuelist window.
    2. Click and drag to select the Wait cells for the range of cues you want to edit.
    3. Press Set.
    4. Edit the timecode value of the first cell then press Enter. All the selected timecode values will be adjusted by the same amount of time added or subtracted from the first value.
  • Unfortunately. Still timecode issue. Reaper (PC/Win10 + MOTU 828MKII) + Road HOG4 (Rosendahl mif4). Road HOG4 (v.3.19.0) sees mif4. The console/processor/cuelist settings are OK. Timecode Generator track generated in Reaper + second audio track. What else should I do?