Contact closure adapter and remote trigger switch for I/O port

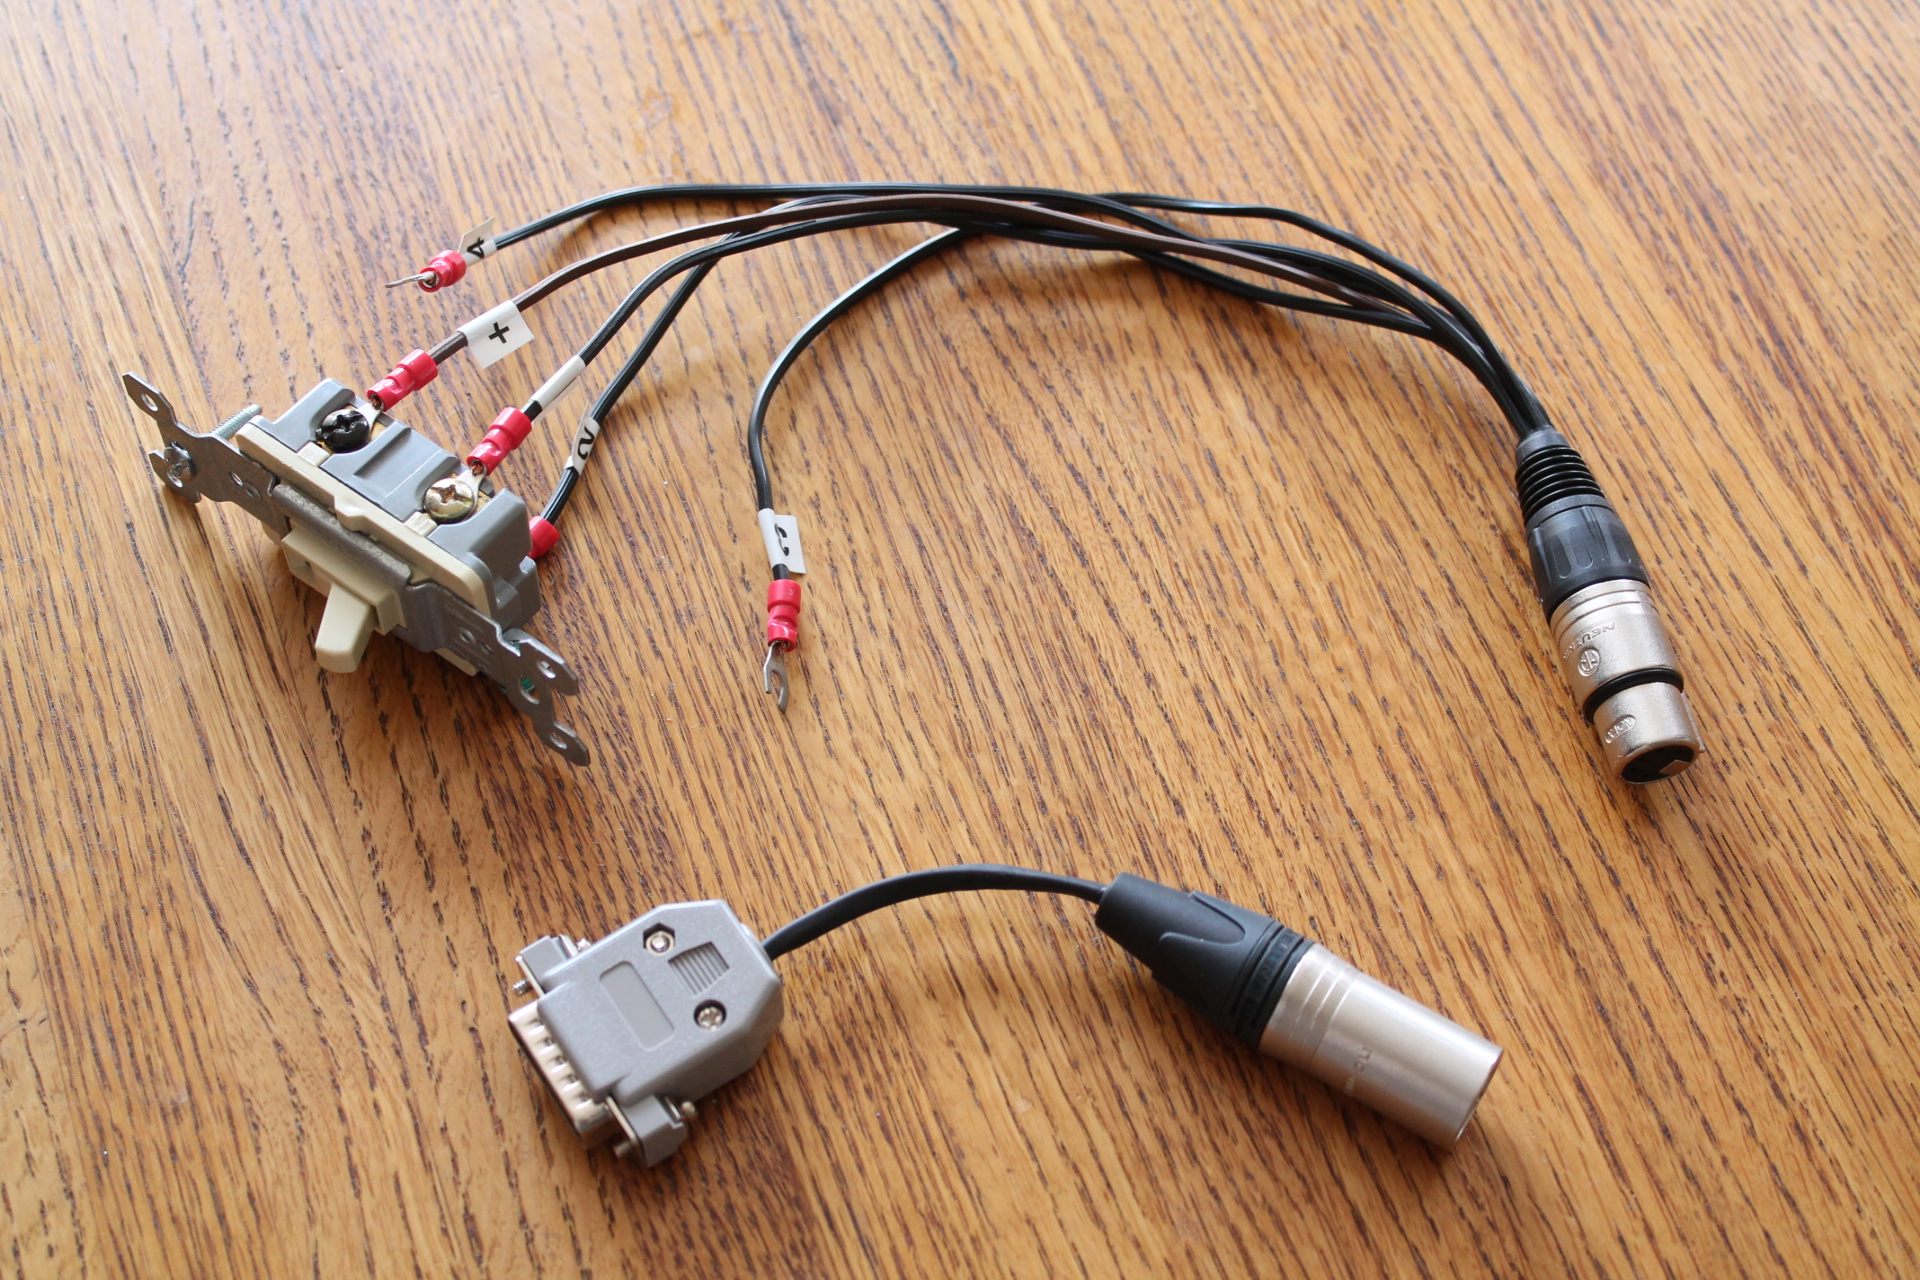
This adapter plugs in to the Remote I/O connector on the back of your Ion, Element, Gio, Gio@5, Eos, or Eos Ti console or I/O Gateway and accepts a standard 5-pin XLR control cable. (Some people would call it a "DMX" cable but in this case it isn't used to transmit DMX data.) Use it to trigger a cue, macro, or submaster remotely.

Uses

  • Allows an actor to turn any number and wattage of lights on and off using a practical wall switch
  • Put a switch next to your DP or gaffer to let him/her trigger a cue
  • Simple house lights control for the cleaning staff
  • Set up a switch next to your house light switches for easy access to kill the lights in your rig when the house lights are up
  • Gaslight anyone on the crew by building a light switch into the wall that only "works" when you want it to

Features
Allows up to 4 different cues, macros, or submasters to be run from 4 different control circuits
A SPDT switch allows one cue, macro, or submaster to be triggered from the "up" position and another to be triggered from the "down" position
Allows any number of switches to control the same cue, macro, or submaster (through the use of jumpers, not supplied)
Compatible with any 5-pin XLR cable
Compatible with any 3-pin XLR cable with use of adapters (2 control circuits only.) Does not have to be DMX-grade cable.
Compatible with a standard networking "Ethernet" cable with use of adapters.
The male end is at the console, preventing anyone from plugging a DMX line into it
Tested to work with 400' of control cable

---


contact closure adapter set


Edit: The original Eos doesn't have a 15-pin connector on the back.
[edited by: John728 at 4:32 PM (GMT -5) on Tue, May 30 2017]
  • just out of curiousity: did you do some distance tests?
  • Yes. In fact I was working on Insidious 4 and when we rigged the stage, I got in a boom lift, ran 400 feet of cable from an Ion, up to the ceiling of the stage, across, and down into the set. I installed my switch in the wall and programmed it so flipping it up turns the lights in the set on and flipping it down turns the lights off. It worked perfectly. On the first day of shooting, they shoot a scene where the actor comes into the room, reaches over his head, and turns the lights on by pulling on a pull chain. So for every take, I had to listen to the walkie and hit Go, like a CAVE MAN.

  • Now for sale on Ebay

    https://www.ebay.com/itm/173299095415?ssPageName=STRK:MESELX:IT&_trksid=p3984.m1558.l2649

    ---

    https://www.ebay.com/itm/173299095415?ssPageName=STRK:MESELX:IT&_trksid=p3984.m1558.l2649

  • I'm programming on a series in Mass. where they've done the same thing a number of times, a pull chain on a fixture that's visible in the shot. And several times they insisted that it needed to be practical, the actress actually turned the light on with the chain and I had to match the timing of the flow of electrons... in the dark... so my next step is to get a tinkerer to design an interface that detects current flow in the line and closes a contact to run a macro (or cue). I know it can be done. No idea what's involved.
  • Is the fixture permanently installed into an actual ceiling of a rented location?
  • No, we're on a stage with constructed sets. I can get to the plugging and wiring of practicals.
  • You need a relay with a 120V coil. They are pretty common and not very expensive.

    The fixture AC goes through the coil and closes the relay. The relay is just a 'dry contact' to the DB9 connector on the back of your console. Check the manual for pin-outs. A handy person could put the relay in a box with power in & out connectors of your choice and a relay out for a handy cable type (mic or DMX?) for the run to the booth. An adapter there to the console connector will make things pretty simple.

    Most of the work is just wiring so you don't need an engineer, just someone with tool skills. Best of all the whole rig is adaptable and reusable.

  • In that case, all you have to do is unplug the fixture, open up the fixture, cut and strip the wires going into and out of the switch, and wire nut them together.

    If you want to make the switch trigger the cue, then you take the two leads from the switch and wire them to your contact closure. (You could use my invention for that. :) )

    Put the housing back together, plug the fixture into one of your dimmers, and you're good to go.

  • In the case of the talent actually pulling the pull chain to turn the lamp on, a relay would have to be triggered by the flow of current to the lamp, since the v input would already be present, right? Another caveat is that I'll need the relay solenoid to engage under a wide range of voltages, for instance, if I'm running the practical at 12%, which happens. Electronics tinkerer friend suggests modifying the guts of an Amprobe to trigger a relay. He also suggested an on-set optical trigger cued to the light emitted by the practical, but that seems dicey in practice. I suppose it would be possible to make several of these for different voltage ranges, swap it out quickly if the input voltage dropped below a certain range.

  • John, all that would be pretty basic and easy if I knew about the cue, and especially that the talent was going to trigger it on-camera, more than about 45 seconds before we roll. (I expect you've been there!) That's why I'm looking for something I can slap into, or onto, a practical circuit double-quick and trigger a Go macro or cue through the analog port.
  • Yes, it's the amperage that triggers the relay, not the voltage. You will need to define a minimum voltage to design the system around. Also a maximum amperage the unit can handle without burning up. That's where an amprobe comes in handy. An optical sensor will always give you a delay in triggering, and you already have some due to processing and signal travel.

    An independent switch like John mentions is always preferred, but not always practical. Though a touch sensitive trigger could easily be attached to anything metal. I've got some in built in furniture lights and attached to the door hinge. I've never tried it, just came to mind while writing this!
  • Cool idea. As usual, it's the decide-everything-at-the-last-minute nature of a film set that is driving this. It has to be easy and fast to rig or it'll sit on the shelf.
  • Hey there! Nice post. I'm wondering how you were able to trigger using both the up and down position. Is it my current understanding that you can only trigger one way (i.e. when you complete the circuit, flipping the switch up). Is there a way to trigger on the same switch when switching it down from the up position?


    EDIT: Oh! I see! You need to have a SPDT switch, and use two addresses for it. 

  • Yes, essentially two switches (or up to four, since there are 4 contact closures available). Each can run a separate macro or function depending on how you program it. It's the first momentary contact that triggers the function. Reopening the closed switch won't do anything.
Related