Reading conventional focus charts

Hi All I just had a quick question about the conventional focus paperwork, 

For instants Ch.179 

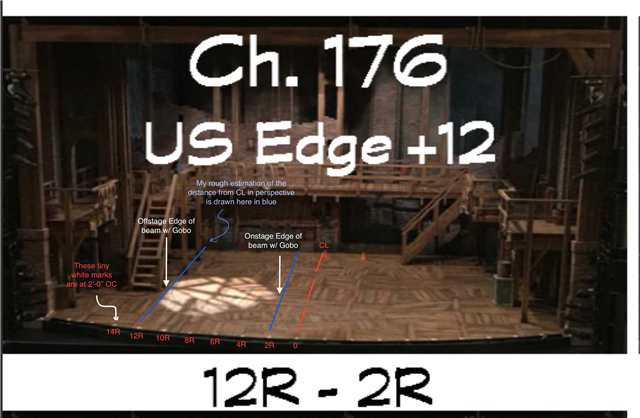
US Edge +20 ( this means that the Upstage edge of the gobo is at +20 feet correct?

under the picture there is 11R - 2R ( dose this mean that the centre of the Gobo is at 11 feet upstage and 2 feet stage right? 

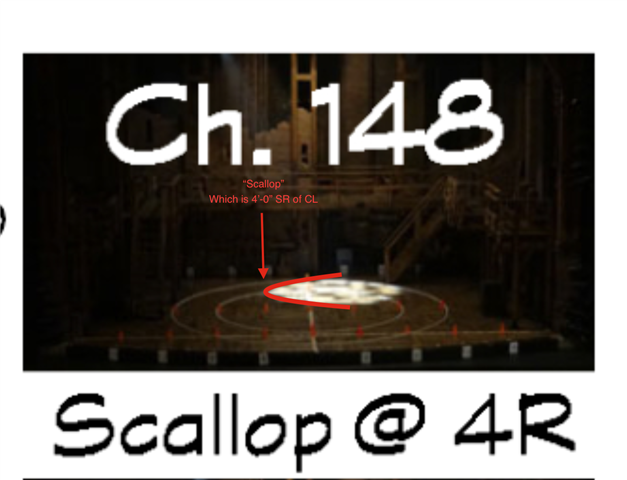
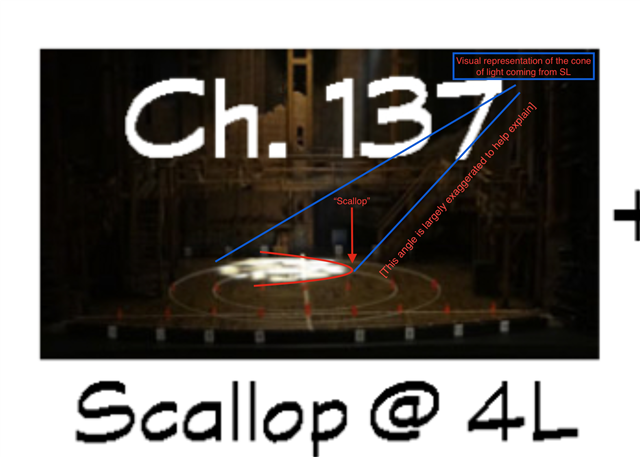
With Ch. 148 it's 8 feet upstage with the Scallop @ 4 feet stage right, What is a Scallop?

Going to be doing this with some students and what to be sure I have the right answers to their questions 

thanks John 

  • Hey John, sounds like a great project to work on with students!

    Looking at ch. 179.

    US Edge + 20 = Yes, this means that the Upstage-most edge of the gobo is 20'-0" US of the Origin 0,0.

    Therefore, the US-most edge of ch. 179 & the US-most edge of ch. 178 should line up if observing from a section or offstage view, since they both have "US Edge + 20" notated. This differs from ch. 177, which actually has "Tip off Stairs" as the visual indicator for where the US edge of the gobo needs to land. It's still referring to the US-most edge of the gobo. The expanded verbiage might be "Tip the unit DS until the US edge is off the Stairs".

    The secondary numbers under each photo are the SL/SR (approximated) spread of the gobo. So, for ch. 179: the onstage side of the gobo lands at 2'-0" SR of CL. The offstage (more SR) side of the gobo lands at 11'-0" SR of CL. So, the total light spans from 11R - 2R. You can also observe ch. 178 for comparison. This unit spans 6R - 6L. [6'-0" SR to 6'-0" SL] The pool of light is approximately 12'-0" wide.

  • I wanted to get a quick screenshot to help me explain "Scallop":

    Essentially, when focusing any light other than a Top light, it is common to refer to the curved edge of the beam closest to the focuser or the instrument itself as the "scallop". This is especially common with focusing any type of side lights, High-sides, Pipe-Ends, Heads/Mids etc. but it can also be applied to Front lights, Back lights, etc depending on your personal way of working.

    Sorry for the low res, I just zoomed way in on the PDF. 

    So, since this ch. is part of the system of High Cross (or X) coming from SR, the "scallop" is on the SR side of this beam.

    For ch. 137, the "scallop" in question is the SL-most arc of the beam. Here, I over-exaggerated where the unit is hung, to help show how this is applied in other contexts. It is actually a steeper shot than the blue lines I drew, you can actually see the beam of the light originating somewhere above the "3" in "137" on the picture below.

    I hope this helps ! Have fun with the students!

  • For further reference, you can also zoom waaaay in on the PDF's, if you're viewing them on a computer. This isn't helpful for those that have printed out the focus charts, but some may still find this useful!

    When you zoom in on even the smaller pictures, you can see the little white cards flat at the DS edge of the show deck that are on 2'-0" centers. With pictures taken from the balcony like they did here, you can quickly get your bearings and make estimations of where things are on stage. Even without laying out focus tape or the focus cones, though obviously that's the more accurate way to go.


    (Click on the image to expand it and view my markups)

    Also note that in other images from other systems, like the 130's and 140's [Temp X systems] - there are also different numbers hanging off the DS edge of the stage, that are on 4'-0" centers, in addition to the 2'-0" markers that are smaller and laid flat. This is clear in the image of G131, where you can see both sets of reference numbers:

    Just some quick ways to get your bearings for a quick reference! Like I said above, using focus tape and focus cones will always be the way to ensure accuracy, so I wanted to repeat that I'm not replacing that methodology with these tips. 

    I hope this proves useful :)

  • This is great thank you all, you learn something new every day,  

  • This is all really helpful. One more question, what does the "Sharp to temp + R132" mean. I'm guessing gel R132 but what's the rest?

  • Sharp to temp, I think means shart focus to the gobo (template) 

  • Yeah I worked that out since asking the question. A lot of learning tonight. Phew!

  • Yep, as said, it's shorthand for specifying the edge to sharpen to.

    In real life, this particular system would have the electrician focusing first insert the template (gobo), and then run the barrel sharp to the center of the gobo. (Or to one particular area of the gobo, as referenced by the LD or ALD focusing - in a 36deg or 50deg you have to kind of "pick an area" to be sharp due to the optics). Then when the designer is ready to see it, drop in the R132. 

    Focusing a system sharp to the template and then dropping in R132 or *choose your own diffusion* helps to prevent the certain uneven quality that can occur if you are just running the barrel for each individual light to achieve a soft edge.

  • This is possibly a reference to a specific part of the gobo that they are cutting to with that onstage cut, or just a mistype. Or another reference point like perhaps scenery / a part of the show deck / something that isn't provided in this version of the paperwork explicitly.

    However, you can see in the focus chart that while the full span of the template would be from 8'-0" SR to 16'-0" SR (and this is how they'd center the beam before making any cuts), the onstage cut is actually made at about 10'-0" SR.

    In this case, it appears as if they've kept the shutter cut pretty much straight US/DS. As opposed to following one of the "natural lines" within the template that is projected onto the deck. That being said, look at the image for G125. I'd say that our channel in question here has it's onstage cut lined up pretty carefully with a certain line in ch. 125's temp. So that's what I'd personally try and match.

    Hope that helps!

Related